Need to resize image by pixels, percentage, or a specific file size? The correct method depends on where the image will be used. Exact pixel dimensions are best for forms, websites, thumbnails, and platform requirements. Percentage resizing is faster when you only need to scale an image up or down. Target file-size resizing is useful when an upload must stay below a limit such as 100 KB, 500 KB, or 1 MB.
This guide explains each method, shows you how to preserve the original proportions, and helps you avoid stretched or blurry results. You can follow the steps with the free NasajTools Image Resizer, which processes supported local images in your browser and does not require an account.
Quick answer: Use pixels when you know the required width and height, percentage when you want proportional scaling, and target file size when an upload has a KB or MB limit. Keep the aspect ratio locked unless you intentionally need different proportions.
Table of Contents
- What image resizing means
- Pixels vs percentage vs file size
- How to resize image by pixels
- How to resize by percentage
- How to resize to a target file size
- How to prevent stretched images
- How resizing affects quality
- Choosing JPG, PNG, or WebP
- Common resizing mistakes
- Frequently asked questions
What Does It Mean to Resize an Image?
Image resizing changes the pixel dimensions of an image. A photo that measures 2400 × 1600 pixels can be reduced to 1200 × 800 pixels while keeping the same 3:2 shape. The resized version contains fewer pixels, normally uses less storage, and is easier to upload or display.
Resizing is different from cropping. Resizing keeps the complete picture but changes its dimensions. Cropping removes part of the picture. It is also different from compression, which reduces file size by changing how image data is stored. If the dimensions are already correct and you only need a smaller file, use the Image Compressor instead.
Pixels vs Percentage vs File Size: Which Method Should You Use?
| Resize method | Best for | Example | Main limitation |
|---|---|---|---|
| Pixels | Exact width and height requirements | 1200 × 630 px | Wrong proportions can stretch the image |
| Percentage | Quick proportional scaling | 50% of the original size | Does not guarantee an exact final width |
| Target file size | Upload limits measured in KB or MB | Below 500 KB | The result is an approximation |
If a website or application gives you exact dimensions, resize image by pixels. If it says “make the image half-size,” use percentage. If it only provides a maximum upload size, use the target file-size option and inspect the final quality before submitting the image.
How to Resize Image by Pixels Online
Pixel resizing gives you direct control over width and height. It is the correct choice for profile photos, banners, product images, document uploads, website sections, and any form that specifies exact dimensions.
Step 1: Upload the Image
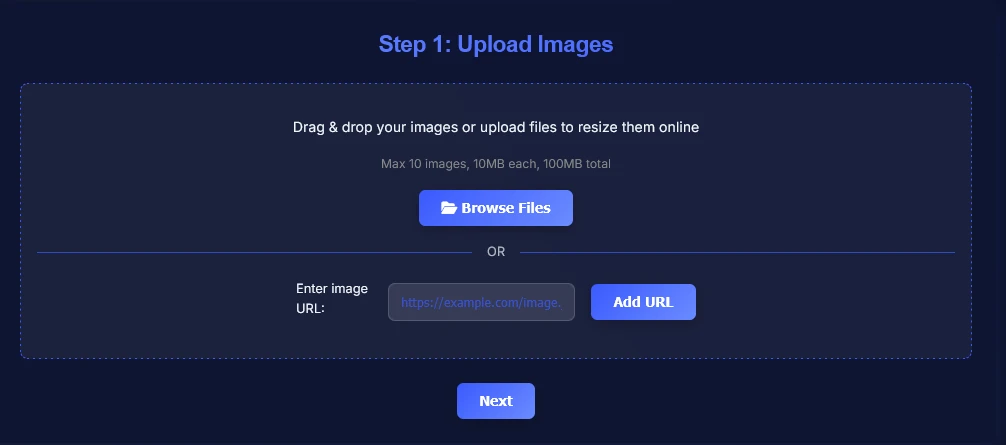
Open the free online image resizer. Upload a JPG, PNG, or WebP image from your device. You can also drag and drop supported files or process multiple images in one session.
Step 2: Select “By Pixels”
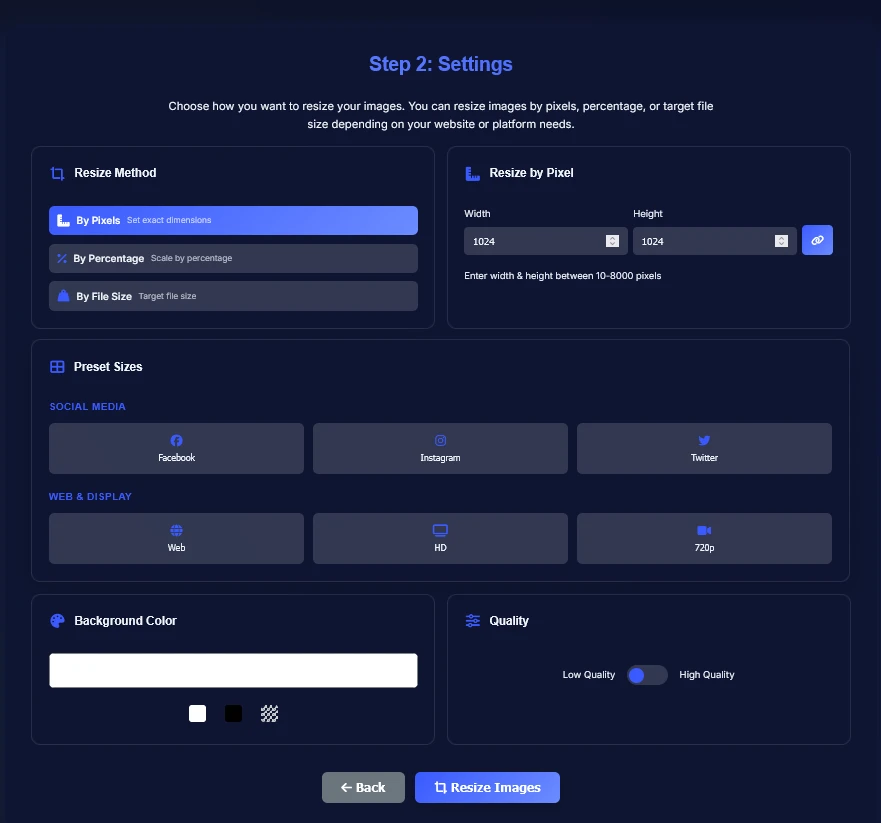
Choose the pixel method and enter the required width and height. The tool accepts dimensions between 10 and 8000 pixels. Keep the aspect-ratio control locked if you want the image to remain proportional.
Step 3: Review the Dimensions
Before processing, confirm that the values match your destination. Width is the horizontal measurement; height is the vertical measurement. Reversing them can turn a landscape layout into a portrait layout.
Step 4: Resize and Download
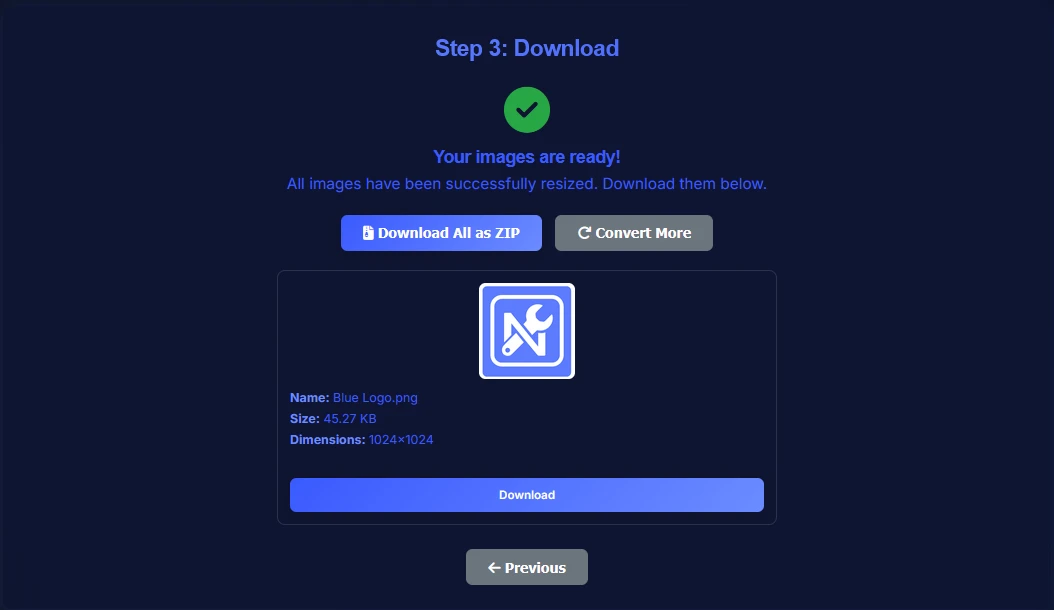
Select the resize action, wait for browser processing to finish, and download the result. Open the downloaded image and inspect important details such as text, logos, faces, and sharp edges before using it.
How to Resize an Image by Percentage
Percentage resizing scales the original dimensions mathematically. At 50%, both width and height become half of their original values. A 2000 × 1200 image becomes 1000 × 600. At 200%, it becomes 4000 × 2400.
Use this method when you do not need an exact width but want a consistent proportional change. To resize image by percentage:
- Upload a supported image.
- Choose the percentage resize method.
- Enter a value between 1% and 1000%.
- Process the image and inspect the result.
- Download the resized file.
Values below 100% reduce dimensions. A value of 100% keeps the original dimensions. Values above 100% enlarge the image, but enlargement does not create missing detail. Excessive enlargement usually makes photos look soft or pixelated.
How to Resize an Image to a Specific File Size
Some portals care about storage size rather than dimensions. A job application might require a photo below 200 KB, while an email system might reject attachments above a certain limit. In those cases, choose the target file-size method.
- Upload the image.
- Select the file-size method.
- Enter a target between 1 and 10,240 KB.
- Choose the appropriate quality setting.
- Process and download the result.
- Check the final file size and visual quality.
A target is not a mathematical guarantee. Image complexity, format, transparency, dimensions, and encoding quality all affect the result. A detailed photograph is harder to reduce than a simple graphic. If the result remains too large, reduce the dimensions or use the dedicated image compression tool.
Why You Should Keep the Aspect Ratio Locked
Aspect ratio describes the relationship between width and height. For example, 1600 × 900 and 1280 × 720 both use a 16:9 ratio. When the ratio stays locked, changing one dimension automatically calculates the other.
Unlocking the ratio lets you set any width and height, but that freedom can distort the image. Faces may look too wide, circles may become ovals, and logos may appear stretched. Only unlock it when the destination explicitly requires dimensions that do not match the original shape and you accept the distortion.
If you need a different shape without distortion, cropping is normally the better solution. Resizing changes dimensions; cropping changes which part of the image remains visible.
Does Resizing an Image Reduce Quality?
Reducing dimensions removes pixels, but a careful reduction can still look sharp at its intended display size. Problems usually appear when an image is enlarged beyond its original dimensions, resized repeatedly, saved with overly aggressive quality settings, or stretched into the wrong aspect ratio.
Follow these rules:
- Start with the highest-quality original available.
- Resize from the original instead of repeatedly resizing an already edited copy.
- Keep the aspect ratio locked.
- Avoid enlarging unless absolutely necessary.
- Inspect text, logos, edges, and small details at the final display size.
- Keep a separate original file in case you need another size later.
For website performance, serving appropriately sized images prevents visitors from downloading unnecessarily large files. Google’s web performance guidance recommends using correctly sized and responsive images rather than sending one oversized image to every device. See the official responsive image guidance on web.dev.
JPG, PNG, or WebP: Which Format Should You Choose?
The NasajTools resizer accepts JPG/JPEG, PNG, and WebP inputs. Choosing the correct format matters because every format handles image data differently.
| Format | Best use | Transparency | Typical characteristic |
|---|---|---|---|
| JPG/JPEG | Photos and detailed images | No | Smaller files through lossy compression |
| PNG | Logos, screenshots, and transparent graphics | Yes | Sharp detail but often larger files |
| WebP | Modern website images | Yes | Efficient lossy or lossless compression |
Mozilla’s official image format guide explains the technical differences between common formats. If you need to change the format after resizing, use the Image Converter. For website photos, you can also use the JPG to WebP Converter.
Common Image Resizing Mistakes
Entering Dimensions in the Wrong Order
Width comes first and height comes second. If you need 1200 × 630 pixels, entering 630 × 1200 creates a portrait image instead of a landscape image.
Unlocking the Aspect Ratio Without a Reason
This is the fastest way to create stretched faces, distorted logos, and misshapen graphics. Keep proportional resizing enabled unless you understand the result.
Expecting Enlargement to Restore Detail
Increasing pixel dimensions makes the pixel grid larger; it does not recreate information that was never captured. A small blurry image does not become a sharp professional photo simply because its dimensions increase.
Confusing Dimensions With File Size
A 1200 × 800 PNG can be larger than a 2000 × 1300 JPG because format, transparency, image complexity, and compression all matter. Check both dimensions and storage size.
Ignoring the Downloaded Result
Do not assume processing was successful just because a download button appeared. Open the final file, confirm its dimensions and size, and inspect its visual quality.
Practical Examples
Example 1: Reduce a Large Photo by Half
Original: 4000 × 3000 pixels. Choose percentage resizing and enter 50%. The expected result is 2000 × 1500 pixels.
Example 2: Create an Exact Banner
Required size: 1200 × 630 pixels. Choose pixel resizing, enter the required dimensions, and inspect whether the original ratio fits. If it does not, crop rather than stretching important subjects.
Example 3: Meet a 500 KB Upload Limit
Choose target file size and enter 500 KB. Process the image, inspect the result, and compress or reduce dimensions further if the portal requires a strict maximum.
Resize Images Online With NasajTools
You do not need desktop editing software for a straightforward resize. The NasajTools tool supports exact pixel dimensions, percentage scaling, target file size, multiple supported images, ZIP import, quality controls, and proportional resizing.
Local JPG, PNG, and WebP files are read and processed in your browser. When you use the optional remote URL field, the browser fetches the external image directly; some websites block that request through CORS restrictions.
Resize your image by pixels, percentage, or file size now →
Frequently Asked Questions
How do I resize image by pixels?
Upload a JPG, PNG, or WebP image, choose the pixel method, enter the required width and height, keep the aspect ratio locked, process the image, and download the result.
What is the difference between pixels and percentage resizing?
Pixel resizing creates specific width and height values. Percentage resizing scales the original dimensions proportionally, such as reducing both dimensions to 50%.
Can I resize an image to a specific KB size?
Yes. Choose the target file-size method and enter the desired size in KB. The result is approximate because format, dimensions, image complexity, and encoding quality affect final storage size.
Does resizing an image reduce its quality?
Reducing dimensions can remove detail, but the result can remain sharp at its intended display size. Enlarging beyond the original dimensions is more likely to look blurry or pixelated.
Why should I lock the aspect ratio?
Locking the aspect ratio keeps width and height proportional. This prevents faces, logos, circles, and other subjects from becoming stretched or squeezed.
Which image formats can I resize?
The NasajTools Image Resizer accepts JPG/JPEG, PNG, and WebP image inputs. ZIP files can be used as import containers for supported images.
Can I resize multiple images at once?
Yes. You can add multiple supported images, apply resize settings, process them in one session, download files individually, or export the completed results as a ZIP archive.
Are local images uploaded to a resizing server?
No. Local supported images are read and resized in your browser. Remote image URLs are fetched directly by the browser and may fail when the external website blocks cross-origin access.
Final Takeaway
Use pixels for exact dimensions, percentage for quick proportional scaling, and target file size for KB or MB upload limits. Keep the aspect ratio locked, avoid unnecessary enlargement, and always inspect the downloaded result.
If you need to resize image by pixels today, open the free NasajTools Image Resizer and choose the method that matches your actual requirement.Need to resize image by pixels, percentage, or a specific file size? The correct method depends on where the image will be used. Exact pixel dimensions are best for forms, websites, thumbnails, and platform requirements. Percentage resizing is faster when you only need to scale an image up or down. Target file-size resizing is useful when an upload must stay below a limit such as 100 KB, 500 KB, or 1 MB.
This guide explains each method, shows you how to preserve the original proportions, and helps you avoid stretched or blurry results. You can follow the steps with the free NasajTools Image Resizer, which processes supported local images in your browser and does not require an account.
Quick answer: Use pixels when you know the required width and height, percentage when you want proportional scaling, and target file size when an upload has a KB or MB limit. Keep the aspect ratio locked unless you intentionally need different proportions.
Table of Contents
- What image resizing means
- Pixels vs percentage vs file size
- How to resize image by pixels
- How to resize by percentage
- How to resize to a target file size
- How to prevent stretched images
- How resizing affects quality
- Choosing JPG, PNG, or WebP
- Common resizing mistakes
- Frequently asked questions
What Does It Mean to Resize an Image?
Image resizing changes the pixel dimensions of an image. A photo that measures 2400 × 1600 pixels can be reduced to 1200 × 800 pixels while keeping the same 3:2 shape. The resized version contains fewer pixels, normally uses less storage, and is easier to upload or display.
Resizing is different from cropping. Resizing keeps the complete picture but changes its dimensions. Cropping removes part of the picture. It is also different from compression, which reduces file size by changing how image data is stored. If the dimensions are already correct and you only need a smaller file, use the Image Compressor instead.
Pixels vs Percentage vs File Size: Which Method Should You Use?
| Resize method | Best for | Example | Main limitation |
|---|---|---|---|
| Pixels | Exact width and height requirements | 1200 × 630 px | Wrong proportions can stretch the image |
| Percentage | Quick proportional scaling | 50% of the original size | Does not guarantee an exact final width |
| Target file size | Upload limits measured in KB or MB | Below 500 KB | The result is an approximation |
If a website or application gives you exact dimensions, resize image by pixels. If it says “make the image half-size,” use percentage. If it only provides a maximum upload size, use the target file-size option and inspect the final quality before submitting the image.
How to Resize Image by Pixels Online
Pixel resizing gives you direct control over width and height. It is the correct choice for profile photos, banners, product images, document uploads, website sections, and any form that specifies exact dimensions.
Step 1: Upload the Image
Open the free online image resizer. Upload a JPG, PNG, or WebP image from your device. You can also drag and drop supported files or process multiple images in one session.
Step 2: Select “By Pixels”
Choose the pixel method and enter the required width and height. The tool accepts dimensions between 10 and 8000 pixels. Keep the aspect-ratio control locked if you want the image to remain proportional.
Step 3: Review the Dimensions
Before processing, confirm that the values match your destination. Width is the horizontal measurement; height is the vertical measurement. Reversing them can turn a landscape layout into a portrait layout.
Step 4: Resize and Download
Select the resize action, wait for browser processing to finish, and download the result. Open the downloaded image and inspect important details such as text, logos, faces, and sharp edges before using it.
How to Resize an Image by Percentage
Percentage resizing scales the original dimensions mathematically. At 50%, both width and height become half of their original values. A 2000 × 1200 image becomes 1000 × 600. At 200%, it becomes 4000 × 2400.
Use this method when you do not need an exact width but want a consistent proportional change. To resize image by percentage:
- Upload a supported image.
- Choose the percentage resize method.
- Enter a value between 1% and 1000%.
- Process the image and inspect the result.
- Download the resized file.
Values below 100% reduce dimensions. A value of 100% keeps the original dimensions. Values above 100% enlarge the image, but enlargement does not create missing detail. Excessive enlargement usually makes photos look soft or pixelated.
How to Resize an Image to a Specific File Size
Some portals care about storage size rather than dimensions. A job application might require a photo below 200 KB, while an email system might reject attachments above a certain limit. In those cases, choose the target file-size method.
- Upload the image.
- Select the file-size method.
- Enter a target between 1 and 10,240 KB.
- Choose the appropriate quality setting.
- Process and download the result.
- Check the final file size and visual quality.
A target is not a mathematical guarantee. Image complexity, format, transparency, dimensions, and encoding quality all affect the result. A detailed photograph is harder to reduce than a simple graphic. If the result remains too large, reduce the dimensions or use the dedicated image compression tool.
Why You Should Keep the Aspect Ratio Locked
Aspect ratio describes the relationship between width and height. For example, 1600 × 900 and 1280 × 720 both use a 16:9 ratio. When the ratio stays locked, changing one dimension automatically calculates the other.
Unlocking the ratio lets you set any width and height, but that freedom can distort the image. Faces may look too wide, circles may become ovals, and logos may appear stretched. Only unlock it when the destination explicitly requires dimensions that do not match the original shape and you accept the distortion.
If you need a different shape without distortion, cropping is normally the better solution. Resizing changes dimensions; cropping changes which part of the image remains visible.
Does Resizing an Image Reduce Quality?
Reducing dimensions removes pixels, but a careful reduction can still look sharp at its intended display size. Problems usually appear when an image is enlarged beyond its original dimensions, resized repeatedly, saved with overly aggressive quality settings, or stretched into the wrong aspect ratio.
Follow these rules:
- Start with the highest-quality original available.
- Resize from the original instead of repeatedly resizing an already edited copy.
- Keep the aspect ratio locked.
- Avoid enlarging unless absolutely necessary.
- Inspect text, logos, edges, and small details at the final display size.
- Keep a separate original file in case you need another size later.
For website performance, serving appropriately sized images prevents visitors from downloading unnecessarily large files. Google’s web performance guidance recommends using correctly sized and responsive images rather than sending one oversized image to every device. See the official responsive image guidance on web.dev.
JPG, PNG, or WebP: Which Format Should You Choose?
The NasajTools resizer accepts JPG/JPEG, PNG, and WebP inputs. Choosing the correct format matters because every format handles image data differently.
| Format | Best use | Transparency | Typical characteristic |
|---|---|---|---|
| JPG/JPEG | Photos and detailed images | No | Smaller files through lossy compression |
| PNG | Logos, screenshots, and transparent graphics | Yes | Sharp detail but often larger files |
| WebP | Modern website images | Yes | Efficient lossy or lossless compression |
Mozilla’s official image format guide explains the technical differences between common formats. If you need to change the format after resizing, use the Image Converter. For website photos, you can also use the JPG to WebP Converter.
Common Image Resizing Mistakes
Entering Dimensions in the Wrong Order
Width comes first and height comes second. If you need 1200 × 630 pixels, entering 630 × 1200 creates a portrait image instead of a landscape image.
Unlocking the Aspect Ratio Without a Reason
This is the fastest way to create stretched faces, distorted logos, and misshapen graphics. Keep proportional resizing enabled unless you understand the result.
Expecting Enlargement to Restore Detail
Increasing pixel dimensions makes the pixel grid larger; it does not recreate information that was never captured. A small blurry image does not become a sharp professional photo simply because its dimensions increase.
Confusing Dimensions With File Size
A 1200 × 800 PNG can be larger than a 2000 × 1300 JPG because format, transparency, image complexity, and compression all matter. Check both dimensions and storage size.
Ignoring the Downloaded Result
Do not assume processing was successful just because a download button appeared. Open the final file, confirm its dimensions and size, and inspect its visual quality.
Practical Examples
Example 1: Reduce a Large Photo by Half
Original: 4000 × 3000 pixels. Choose percentage resizing and enter 50%. The expected result is 2000 × 1500 pixels.
Example 2: Create an Exact Banner
Required size: 1200 × 630 pixels. Choose pixel resizing, enter the required dimensions, and inspect whether the original ratio fits. If it does not, crop rather than stretching important subjects.
Example 3: Meet a 500 KB Upload Limit
Choose target file size and enter 500 KB. Process the image, inspect the result, and compress or reduce dimensions further if the portal requires a strict maximum.
Resize Images Online With NasajTools
You do not need desktop editing software for a straightforward resize. The NasajTools tool supports exact pixel dimensions, percentage scaling, target file size, multiple supported images, ZIP import, quality controls, and proportional resizing.
Local JPG, PNG, and WebP files are read and processed in your browser. When you use the optional remote URL field, the browser fetches the external image directly; some websites block that request through CORS restrictions.
Resize your image by pixels, percentage, or file size now →
Frequently Asked Questions
How do I resize image by pixels?
Upload a JPG, PNG, or WebP image, choose the pixel method, enter the required width and height, keep the aspect ratio locked, process the image, and download the result.
What is the difference between pixels and percentage resizing?
Pixel resizing creates specific width and height values. Percentage resizing scales the original dimensions proportionally, such as reducing both dimensions to 50%.
Can I resize an image to a specific KB size?
Yes. Choose the target file-size method and enter the desired size in KB. The result is approximate because format, dimensions, image complexity, and encoding quality affect final storage size.
Does resizing an image reduce its quality?
Reducing dimensions can remove detail, but the result can remain sharp at its intended display size. Enlarging beyond the original dimensions is more likely to look blurry or pixelated.
Why should I lock the aspect ratio?
Locking the aspect ratio keeps width and height proportional. This prevents faces, logos, circles, and other subjects from becoming stretched or squeezed.
Which image formats can I resize?
The NasajTools Image Resizer accepts JPG/JPEG, PNG, and WebP image inputs. ZIP files can be used as import containers for supported images.
Can I resize multiple images at once?
Yes. You can add multiple supported images, apply resize settings, process them in one session, download files individually, or export the completed results as a ZIP archive.
Are local images uploaded to a resizing server?
No. Local supported images are read and resized in your browser. Remote image URLs are fetched directly by the browser and may fail when the external website blocks cross-origin access.
Final Takeaway
Use pixels for exact dimensions, percentage for quick proportional scaling, and target file size for KB or MB upload limits. Keep the aspect ratio locked, avoid unnecessary enlargement, and always inspect the downloaded result.
If you need to resize image by pixels today, open the free NasajTools Image Resizer and choose the method that matches your actual requirement.